Are you looking for a beginner’s guide on how to start a self-hosted WordPress blog and make money blogging in 2019? Here’s an incredible step-by-step guide to help you start a blog and make money blogging. Using this guide, you can comfortably create a blog that will make your life turn around through great earnings if you do it as guided here.
I have realized that many writers have a passion to earn more. So, they opt to start a self-hosted WordPress blog to make money blogging. But how many bloggers make money blogging? Is it all about creating a blog and assuming that all is said and done? No! There are many things bloggers need to do before they can start to make money blogging. Such include optimizing the blog, optimizing the content, and marketing products and services to get a commission (affiliate marketing), among others.
This article will help you to create a blog, create content and optimize it, and guide you on how to make money blogging. Before I take you through how to start a self-hosted WordPress blog to make money blogging, there are a few questions you need to answer to determine if you are ready for a blog:
In The Actual Sense, Do You Need a Blog and Do You Have Time to Blog?
You have read stories of many successful bloggers who make money blogging; some making up to six figures per month, and you’ve decided to start a blog, but in the actual sense, do you need a blog? There are so many things you need to put into consideration before you can decide to make money blogging by creating a blog.

One thing you need to consider is your passion for writing. Can you spend hours writing content? Well, if you have no passion for writing, can you hire a great writer to write quality content for you regularly so that you can make money blogging?
If none of the above favors you, then you need to dump the idea of creating a blog as soon as now! Why? Even if your only purpose for having a blog is to market your services and goods, you need content to describe your product, explain how to use it, and the like. Again, if you are hiring a writer, you need to know what quality content is all about so that you will be in a position to identify if the content your writer is producing is quality or poor.
Also, you need to update your blog regularly. So, whether you are to do it all by yourself or hire a writer, you must ensure that your blog is updated periodically. How often? At least once a week would be fine, but if you can do more than that, then the better, especially if your blog is new. You can even create a calendar for your blogging so that you will not miss blogging if you really want to make money blogging.
Avoid this one mistake I see bloggers making; failing to update the blog with content. And if they do, the content is poor and very short. Take your time and write informative, long content so that it can be as detailed as possible.
One thing that some bloggers will not tell you is that blogging is time-consuming. Once you have started it, you need to work hard and sacrifice a lot of time to update it.
Did we say you need to blog regularly? Yes!
That means there are things you will have to lay down if they are unnecessarily consuming much of your time. Use that time to write, publish and update your blog. That’s not all. If your blog has some traffic and several people are leaving comments and asking questions, you’ll need to set a time to respond to those comments.
In short, you can’t make money blogging if you don’t have time for the blog, even if you are able to produce great content. However, if you’ve time to blog, have a passion for writing great content, or can hire a qualified writer, then you qualify to start a blog and make money blogging.
Which Niche Do You Want to Blog About?
Now that you want to make money blogging, what are you going to blog about? To adequately answer this question, you could try to answer this one; how many bloggers do you see publishing content daily? How many of them attract traffic? By answering these questions, you will know that not all content is useful, however informative it may be. And not all informative content may be helpful to your readers.
With that, you need to do a lot of research to determine the various blogs that bloggers create to make money. Get to know if you can blog in the same niche they blog about. Don’t stop there; consider if you have unique points in that niche so that you beat them and rank in the Google search engine.
Consider if you have solutions for people in the niche you want to blog about. If you can’t solve people’s problems, and if people can’t get the information they need on your blog, then there is no need to start a self-hosted WordPress blog.
Take it this way; a doctor report to his office every morning wearing his white coat, fully armed with every tool he needs to take care of all his patients. However, when a patient explains his miseries, the doctor has no idea how to go about it. He can barely treat the patient or advice the patient on the right medicine to take. And if he prescribes the drug for the patient, he prescribes the wrong medication. What do you think will happen by the end of the day?
Patients will look for other clinics to get treatment, and sooner than you think, that clinic will have to close its doors. In the same way, if your blog cannot give the right information and solve readers’ problems, nobody will take the time to revisit it.
You should also do enough research to know if the niche you want to dive into has many readers. Do people love reading articles on that niche? Do those who blog in that line have many followers? If not, then be sure you may not be an exception. There is much to do and think about before you can finally decide to start a self-hosted WordPress blog.
Now, it’s time to come up with a good name for your blog.
Do You Have a Suitable Name for Your Self-hosted WordPress Blog?
I thought it would be easy to come up with a name for my blog until when I realized that all the names I wanted were not available. It took me more than thirty minutes to come up with a good name for my blog. So, how do you go about it, especially when someone has taken the name you so dearly want?
Here are a few tips to help you;
Firstly, don’t use a name that is too complicated and difficult for people to remember. This is a mistake I made when naming my free blog (I pulled it down!). I did not know it was complicated until one day; someone told me the name was too long to remember.
Let your name be short and easy enough for somebody else to remember. Remember, you don’t want your visitors to have difficulty recalling the name of that excellent blog they had visited the previous day, right? Therefore, make it easy for the old and the young to remember the name of your site.
And you’ll see how fast you can make money blogging once you start a self-hosted WordPress blog that has a simple name.
Secondly, let the name agree with the motive for starting your self-hosted WordPress blog. Since you now have a niche you want to blog about, come up with a name that relates to that niche. For example; if you want to blog about cooking recipes, your blog name should be something like; “The Ideal Recipes.”
However, it is crucial to note that we are in a race. Competition is the norm of every business. You, therefore, must look for a simple, easy-to-remember, but also UNIQUE name.
What if you have no specific niche you want to blog about?
Why not use your name as your blog name? That, too, is a great idea. That is what I decided to do so that I could make money blogging on anything I wanted.
So, now that you have a name for your blog, you are now ready to start a blog and make money blogging.
Get a Web Hosting and Start a Self-Hosted WordPress Blog
Now, when starting a blog, you need a name for your blog, which we call a domain name. It should go for only $10 annually. You also need web hosting that allows your blog to be visible online.
In the case of web hosting, the prices vary depending on the company you want to host your blog. I suggest you use Site Ground, Blue Host, or HostGator. All these hosts are termed to be good, and they are quick to respond in case of any hosting issues. I use Site Ground since they are also affordable.
Also, I would recommend you use “.com” over” .ke,” “.Uk,” and the like. For example, I use mary-peter.com instead of mary-peter.ke for my self-hosted WordPress blog.
Now, choose the hosting you want. I will mainly focus on Site Ground since that is what I use. If you are starting and need individual hosting, I recommend you use the startup option.
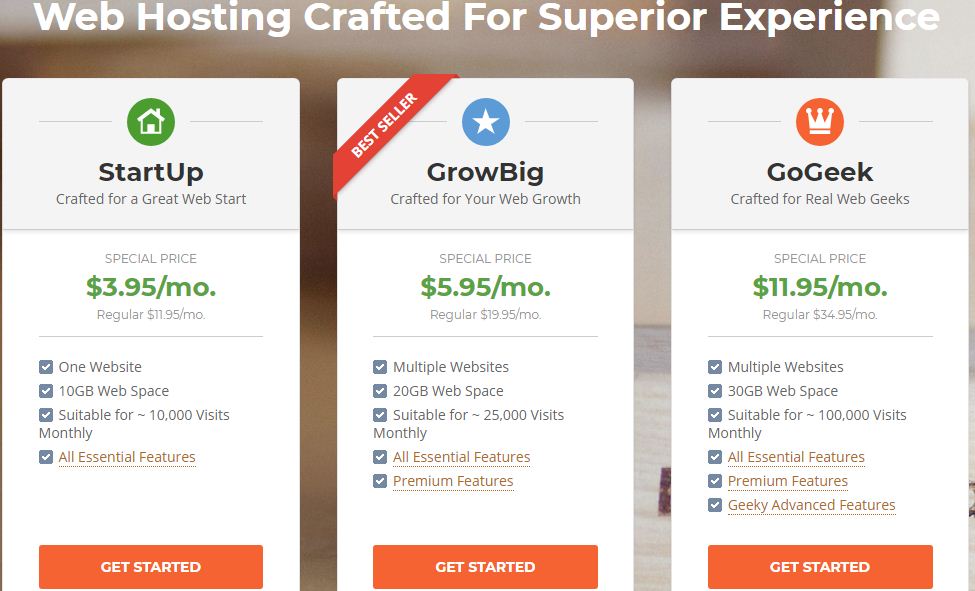
Next, click on “Get started” and choose a domain. Type the name you want in the space provided.

Once you type the domain name, you need to press enter key. They will notify you if the name is available or in use. If the domain is available, then you proceed to the next step; if it is not, they will give you some names that you can choose.

For example, in my case above, I wanted my domain name to be “ProWriter,” but it was not available. Instead, they gave me three options, and I did not want either, so I tried another domain name, “thesuperbwriters” which was available.
So, if you still aren’t content with the options they are giving, type another domain until you get a name you feel comfortable using. Once you get a good name, scroll down to the purchase dialogue box.
I believe that your plan will still be selected for you.
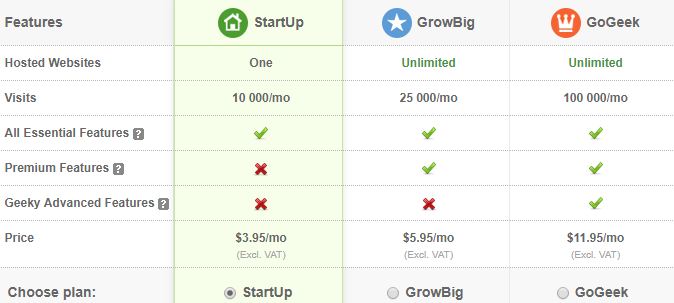
Just scroll down unless you want to change to another plan. Now, fill in the information in the “Purchase Information” dialogue box.
State the period of hosting you opt to use.
If you believe that SiteGround is the best web hosting service provider, you can go for the hosting price of 12, 24, or 36 months. For a start, I suggest 12 months. However, if you are not sure if their hosting services are excellent, you can go for the “one-month trial” option.

Now, scroll down and enter payment information. Be sure to enter the right details so that you will not have trouble later.
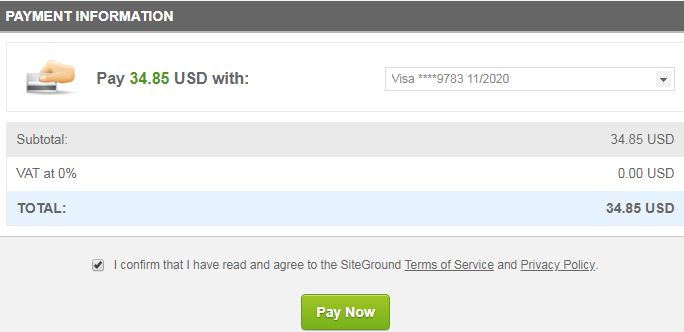
Once you confirm that all the information you have given is okay, check the “I agree to the terms of service and privacy policy of site” box. Finally (hoping you have enough amount in your account), click on pay now. Note, the total price indicated below is for the “one-month trial” option.
It is time to install WordPress. One good thing with Site Ground and some other web hosting service providers like HostGator is you can ask them to install WordPress for you. They will do it in less than five minutes.
You can also choose to follow one of the various ways of installing WordPress in the self-hosted WordPress blog. However, there is nothing complicated in installing WordPress; you can do it by downloading the software and following the steps given.
Once you have successfully installed WordPress, choose a design that you feel comfortable using. The design is what we refer to as a theme. I highly suggest you use the “Maskitto Light” theme if you are going for a free theme. Why “Maskitto Light” theme? It is easy, and a beginner can easily and comfortably use it.
No need to worry about the best theme you should use after you start a self-hosted WordPress blog. Just choose any that you think is okay. In case you don’t like it, you can always change it. Now, to choose a theme, login to your WordPress Adm., and enter your username or email and your password. If you share your computer with nobody, you can check the “Remember me” box to allow it to save your password.
However, computers get stolen, and the thief can have quick access to your site (God forbid) if you have saved the password. Therefore, it is important to enter your details each time you log in.
Move to the dashboard and hover over “Appearance,” then click on “Themes.” Next, click on “Add New.” As we have said, you can choose the “Maskitto Light” theme or any other you wish. Now, click on “Install.” After that, activate your theme by finally clicking on the “Activate” button.
Great! You now have your self-hosted WordPress blog. You need to stand out from the crowd, right? Get down to customizing your site.
Get Your Blog Looking Good By Customizing It
It is time to customize your blog so that it looks professional and attractive and also makes it fits your needs. You will need to customize things like color, menus, widgets, site identity, and the like.
You don’t have to be afraid, thinking you will mess up with the new WordPress blog, no. There’s a preview section on the right that allows you to see every change you make. Now, click on the primary category, which is “Site identity.”
You need an identity, right?
You cannot escape that. Once you start a self-hosted WordPress blog, add a blog name. You can also choose a tagline. For example, I used “Mary Peter as my site name, and my tagline is “The Blogger You Can Trust.” You should “save and publish” every new change you make to ensure you don’t lose the changes after logging out.
Optimize Your Site to Rank on Google Search Engine
Once you start a self-hosted WordPress blog, you need to let the world know. After all, you cannot make money blogging if people are not visiting your site. Let them see the site so that they can visit the self-hosted WordPress blog. You do this by optimizing your website/blog. Bloggers make money blogging by optimizing their sites excellently.
You cannot optimize your site poorly and expect to earn from it. After optimizing your website, people will see your site, they will read your posts, and some will follow you, while others will become daily visitors to your site. That sounds great. Okay!
At least you need to know how to create an “About me page,” “Home page,” and “Contact page” when starting. You must know that it is not an easy thing to do, but you must do it once you start a self-hosted WordPress blog. Remember, you are trying to get people to visit your site and not mine. I also work hard daily to make sure people read my blog posts and not yours. It is ridiculous, but it is the truth we can’t deny.
So, put enough effort into this optimizing part to emerge top of the search engine.
All thanks to the “Yoast plugin” for making optimizing easy for you. If there’s a plugin that is essential, helpful, and friendly is “Yoast SEO.” It is one thing that has made blogging easy and enjoyable for me. Why? Yoast SEO analyzes your site/posts and shows you what you need to improve.
For example; Yoast SEO notifies you when you use passive voice in your blog posts. It also indicates what percentage you have used, and you can further check which sentences contain the passive voice since it can highlight them. You can even know how many times you have used the keyword and if there’s a need to add or lower the keywords.
That’s awesome, right? Don’t miss the benefits. Download and install the Yoast SEO plugin and see how optimizing becomes so easy. So, how do you go about installing the Plugin? Once again, on the dashboard, move the mouse and hover over the plugin. Select “Add new” on the search bar. Search for the “Yoast SEO” plugin, and once you find it, install the plugin by clicking on the “install” button. Remember to activate it by clicking on the “Activate” button.
Are you worried that you don’t know how to use the Yoast SEO plugin? Don’t worry; you will learn to use it to optimize your articles later in this post.
Once you have all your pages intact, it is time to add engaging, well-researched, and original content.
Come Up With Incredible Topics
Now, this will also cost you plenty of time since you need to do a lot of research. You can’t start a blog and make money blogging on anything. No! Remember, we said that you must decide what to blog about before you start a self-hosted WordPress blog. It is now time to come up with a topic that will beat the new bloggers as well as the gurus.
After all, that’s how you get to rank on the Google search engine. You start by coming up with topics you can comfortably write about. One thing that has made it easy for me to get ideas/topics to blog about is the fact that I love learning new things.
Again, when I started blogging, I did not have much knowledge of what was expected of me to rank. So, the first thing I wanted to know is how to optimize my pages/sites for ranking. Therefore, I got another topic to blog about; Ways to Optimize Your Articles for Google.
I could practice everything I learned to be sure everything I wrote was correct and useful. You see, you make money blogging what you have learned and implemented. That’s how the whole process ends up being fun. Now, once you have created your content, ensure it is free of any grammatical errors. And in case you don’t know how to write and format your articles, this article will help you out.
Also, make sure there is no issue of plagiarism. Plagiarism can cause Google to penalize your site.
Avoid it at all costs. Format your piece so that it looks excellent and professional. Once you are comfortable with everything in the content, you need to publish it.
So, how do you go about publishing content on your blog and optimizing it?
Publishing Your First Content
First, log in as an administrator so that you can post your content.
Now, since you have just created a new blog and have not published any blog posts, you need to know that there is a default post that you will find in the “posts” section. You don’t need it. Don’t feel guilty when deleting it.
Again, you don’t want it to be seen on your blog when you publish your new post on the self-hosted WordPress blog. Whoops! I didn’t know this when I created my free blog. Somebody had to tell me to delete it. The free blog was a stepping stone, though.
It is time to publish your content.
On the dashboard, click on “Posts” and select “Add new.” On the Editor’s screen that appears, you can start by entering the title in the space where you are instructed to enter the post title.
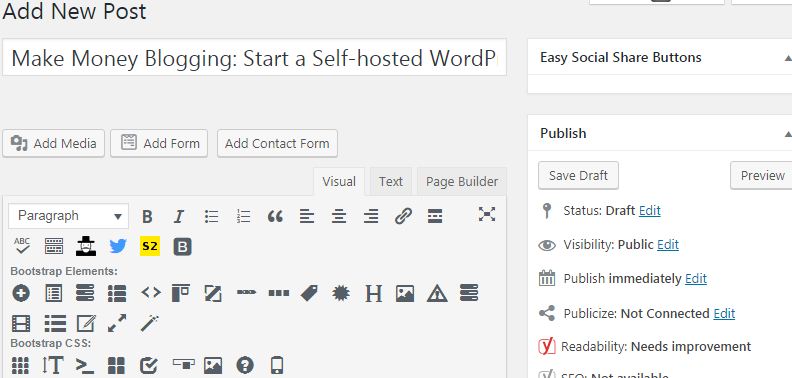
Make sure the Keyword exists in the title so that your URL has a keyword too. I recommend you have the keyword in the first 3-5 words of your (SEO) title.
Copy the content you wrote in Microsoft Word and paste it into the editor’s screen. If you like typing directly on the editor’s screen, start typing.
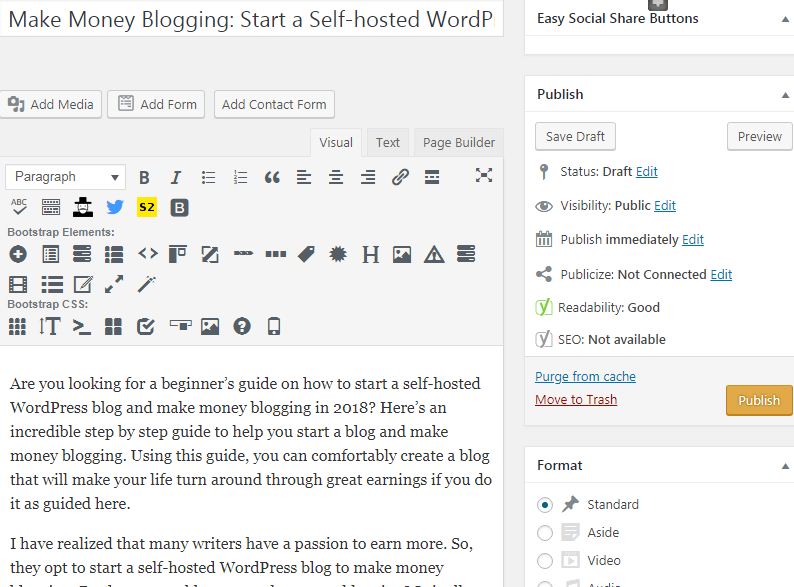
It is crucial to note that images are a perfect way of conveying information to people. Some people will read content because of the image they have seen attached to that content.
It’s, therefore, essential to add an excellent, charming image that is relevant to your content. How do you add a picture?
First, ensure that you have downloaded a good image. I prefer getting images from pixabay.com because they are smart, and you can download whatever size you want. So, for free images, I suggest you get them from Pixabay.com.
When saving your image, I advise you to give the image a file name that has a keyword. Why is it important to save it using the keyword? You see, the keyword helps Google to know what your image is all about, thereby making ranking easy for you.
Now that you have the image place the cursor where you want your image to appear. Avoid having the cursor at the start/top of your post. Why? If you add a featured image, your post will look horrible since featured images appear at the top of the post. Therefore, find a better place for your image and place the cursor there before you click on the “Add media” button. After that, click on the “Add Media” button.

Next, click on “upload files” and select the image you need from your storage location. Then click ok. After uploading the image, on the right, you have some fields that are blank. You need to fill them; though not a must, you fill all of them. But you should have a title for your image and an “Alt text.” So, ensure you fill in these two fields if you don’t want to fill in the others.
However, ensure you have the focus keyword in the “title” field and the “alt text” field. This way, you boost your ranking.
After filling these fields and any others you feel necessary, scroll down and center the image. Also, select the “full size” option so that the image can fit well in the blog post.
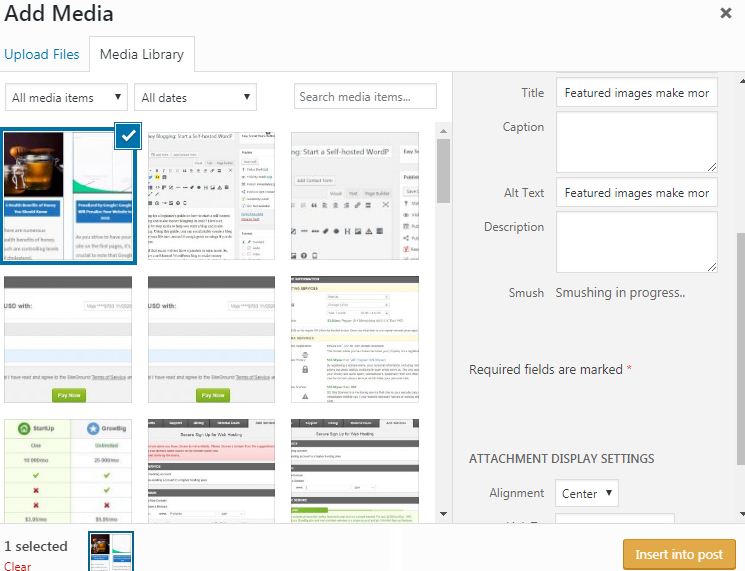
Now, click on the “Insert into post” button to apply the changes to the image and insert it in the content.
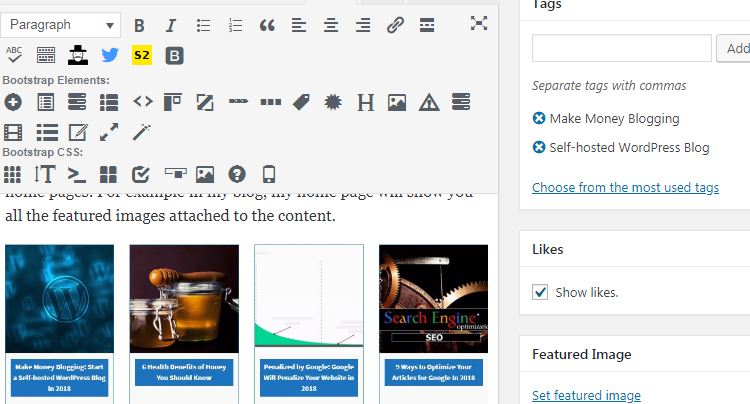
You still need another image. This time around is a featured image. This is what you see appearing at the top of the post or on some home pages. For example, in my blog, my home page will show you all the featured images attached to the content.
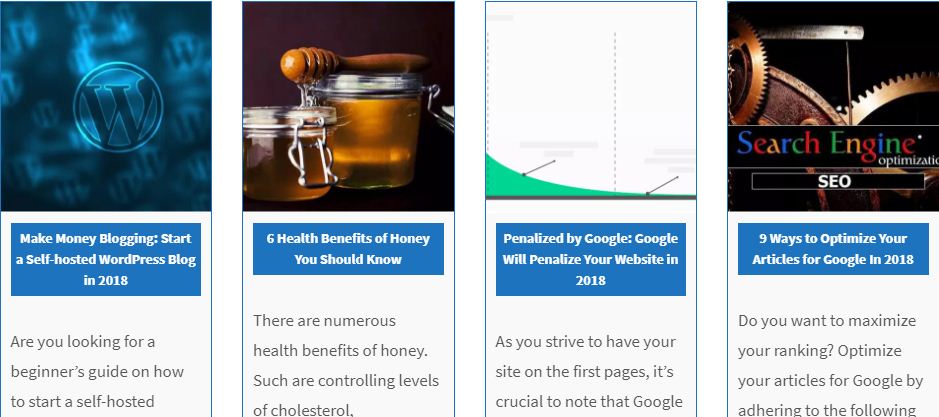
However, in the case of a featured image, it is good to ensure that all photos are of the same size. Why is it vital to do so? If all your featured images are of the same size, they will look smart and organized. But if they are of different sizes, some will be larger while others will be smaller, which doesn’t look professional.
So, decide on the size you will use and always crop all your images to that size. For example, I always crop my images to 643*428. Now, after you have decided on the right size for your featured images, crop the image and save.
Go back to your post and click on the “ set featured image” option on your right-hand side.
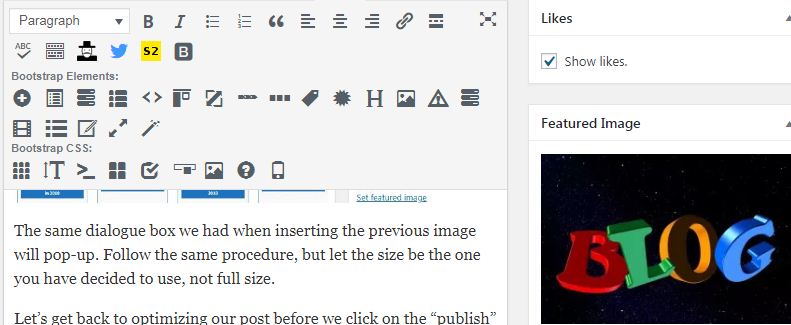
The same dialogue box we had when inserting the previous image will pop up. Follow the same procedure, but let the size be the one you have decided to use, not the full size. You should now see the image on the right-hand side, as I have shown below.
Let’s get back to optimizing our post before we click on the “publish” button. How will you confirm if all things are well optimized? Yoast will always show you. If the color is green, that means you have done it well. Where the color is not green, it shows you need to make some amendments.
So, try as much as you can to have as many green lights as possible. It may be difficult to make everything green but strive to have at least 80 percent green.
How do you achieve this?
First, scroll down until you see “Yoast SEO Premium,” then click on “Edit Snippet” so that you can now type your “SEO title” and the “slug.” The SEO Title is what you have on your post as the post title, and it should be of a good length so that you can have the green light.
Next, write a short Meta description because having it too long will disable the green light; it should also not be too short. You can type until you have the green light. A Meta description is what you see immediately after the title on the search engine. It comes directly after the title.
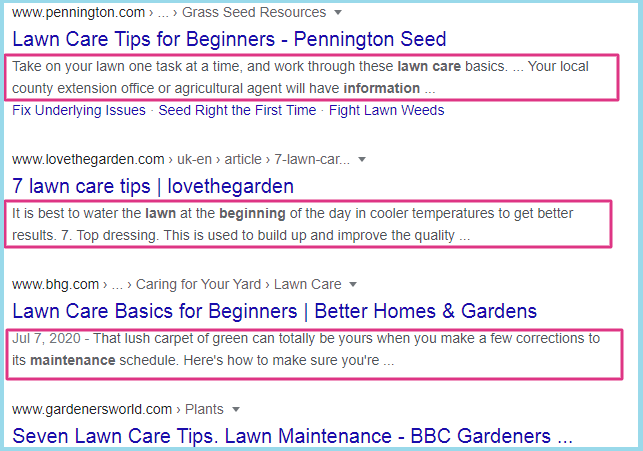
It explains what your post is about, and it contributes a lot by persuading the reader to read the article. You see, if you can persuade many people to read the posts on your self-hosted WordPress blog, you will soon make money blogging.
Therefore, let the meta description be persuasive enough to win the attention of the readers, thereby persuading them to click on your page. Your Meta description, too, should have a keyword. Remember you are optimizing to rank on the search engine. That is why you should include a keyword in the Meta description, the slug, the SEO title, and the image.
Remember not to have a passive voice, long sentences (more than 25 words), plagiarism, and grammatical errors.
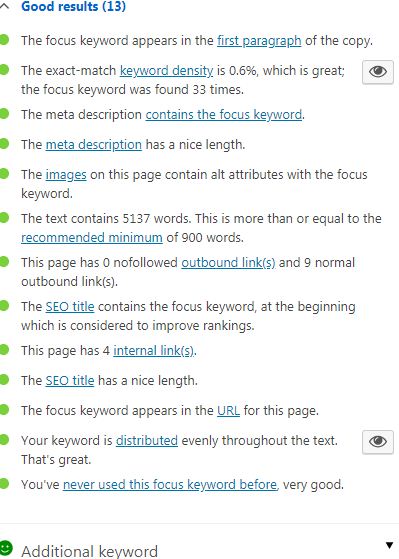
By now, you should have at least 80% of green lights. Hoping you have many green lights to boost your ranking, now click on “Preview” before you publish your content. This is vital since it helps to confirm that the blog post is okay since the way it looks in the preview is how it will be once you publish it.
If there are wide spaces between paragraphs, delete them.
If you are comfortable with everything, go ahead and click on the “publish” button.
Congratulations, your first post is live! But how many people know you have a blog? Maybe your friends, but do they know you have published your first article?
Again, once you start a self-hosted WordPress blog, your focus is not only on friends but the whole world too. Otherwise, it would be difficult to make money blogging if you only wanted your friends to visit your website and not other people. So, what do you do next?
Share Your Blog on Social Media to Make Money Blogging
Once you start a self-hosted WordPress blog, you need to share your post with the world every time you publish an article. Share your post with as many people as you can mostly through Facebook, LinkedIn, Pinterest, and Twitter.
These are the most prioritized social media platforms. However, you are not limited; you can also share on Google+, Skype, and the like.
Now, you need to know how bloggers make money blogging. Why? Once you start a self-hosted WordPress blog, you don’t want always to spend time producing quality content that earns you nothing. Of course, you want to make money blogging, right?
Make Money Blogging by Monetizing Your Blog
After you start a self-hosted WordPress blog, publishing good content is just one step away from making money blogging, especially if you are a great writer. Why? If you share your blog posts widely with the world, and if your content is quality, then people will hire you to write content for them. However, that is just one way of making money through blogging.
What if you are not a writer? Is it possible to start a blog and make money blogging?
Yes, it is!
You can start a self-hosted WordPress blog and make money blogging by selling various products and services. Also, bloggers make money blogging by selling advertising space.
Nevertheless, for a new blog, it is difficult to earn through selling advertising space. Why? People want to advertise in those blogs that are ranking. So, you need to work hard to make your site rank. This way, you will not have to look for advertisers; they will come looking for you to have space to advertise their products and services.
In this case, you will have the privilege of deciding how much you are going to charge them, right? This is why most bloggers make a huge amount of money blogging once they start a self-hosted WordPress blog.
For a new blog, I recommend you start by creating an AdSense account so that Google will do the task of finding advertisers for you. Sign up for an ad sense account since it is free. However, your self-hosted WordPress blog must have several posts to qualify. Also, you must be through with setting up of the blog before you signup for an AdSense Google Account.
So, how do you earn from AdSense? First, you need to know that advertisers pay Google to advertise with them. So, out of what advertisers pay Google, you earn 68% every time a visitor clicks on Ads on your self-hosted WordPress blog. The more clicks, the higher the pay. Bloggers have many secrets that help them make money blogging. This is just one of them.
Conclusion
Just as we have discussed before, you can start a self-hosted WordPress blog, be sure you have enough time for it. Be sure of what you want to blog about before you get started. Just like any other business, you need to give your blog time to grow/rank. Bloggers who make money blogging can affirm that it takes time before you can start earning awesomely through blogging.
Do you want to start a self-hosted WordPress blog and make money blogging, but you don’t know how to write engaging blog posts? Blogging is what I love most, and I’m willing to help you create blog posts that will rank top on the Google search engine.
Do you find it challenging to create a self-hosted blog and need help? Get in touch; I’ll create an excellent self-hosted WordPress website for you at an affordable price. We shall build an excellent website/blog for you.
